From the September 2013 issue of Plastics Engineering Magazine: continuing on a theme he explored in the July/August issue of Plastics Engineering, consultant Mark Rosen looks at how efforts to save money in part development are often counter-productive.
Last month’s article discussed how management is often willing to invest considerable money in the concept design stage of a project but then tries to save money in the engineering and tooling phases. All too often, once a design is ready for tool quotes, companies look for vendors to both identify and fix design mistakes, as well as to provide analysis services—all for free. In addition, companies look to source tooling at the lowest possible costs, putting the burden on the molder to produce quality parts from poor-quality tools. In an effort to save money by getting free advice or low-cost tooling, the outcome is often project delays and long term quality control issues.
This article examines some of the mistakes commonly made by management to try to save money in the plastics product engineering and prototype tooling phase of a project, including two real-world examples that highlight the real costs of these management mistakes.
1.) The Mistake of Not Investing in an Unbiased Technical Team of Advisors for Key Decisions
With the ever-expanding number of plastic materials, tooling, molding, and assembly technologies available today, making good product design and analysis decisions takes a vast amount of knowledge, experience, and effort. Critical team-building, design, and analysis decisions made at the early stage of a project can literally make or break the success of a project. Do not rely on vendors solely for outside technical advice. Build a team of expert, unbiased advisors to assist your team with critical decisions.
2.) 3D CAD and Analysis Software: Faster, Cheaper & Easier to Learn—So What’s the Problem?
Back in the early 1990s, solids modeling programs such as Pro/E and SDRC (and the required hardware) cost around $60,000, while high-end filling-analysis software such as Moldflow or C-Mold could cost upwards of $100,000. In addition, these programs took years to master. Today, for less than $40,000, you can purchase a high-end solids-based CAD modeling and filling-analysis software (like Solidworks and Simpoe-Mold), along with excellent hardware. These programs are much easier to learn. A sharp high-school graduate, with a few lessons, can be taught to model impressive-looking plastic part designs. In another day or so of training he or she can be taught how to mesh a part and run a flow simulation. And using the filling analysis software’s auto-report feature, the user can even produce a nice looking report!
The danger of course, is that pretty pictures may impress management, but producing great plastics product designs and making meaningful analysis decisions still takes years of experience, and requires long hours of testing different ideas.
3.) The Mistake of Relying on a Molder/Toolmaker to Clean up a Design
Moreover, with today’s solids modeling CAD software, inexperienced designers may build CAD files which often result in designs that are not moldable, or that require overly complicated tooling. In some cases, the molder/toolmaker will offer to “clean up” the design for free in order to get the job.
The molder/toolmaker is looking to take the design as-is and simply make it moldable. But the customer wants the best possible design to get an edge over the competition. This requires a deep study of various design, material, and manufacturing options—clearly not something to be done for free by the molder or toolmaker. The best advice in this situation is to use outside expertise along with the toolmaker’s input to produce a better design.
4.) The Mistake of Not Understanding the Complexity of Material Selection
Selecting the right material from tens of thousands of available types and grades is no easy task. When talking to material suppliers or looking at data sheets, engineers often end up selecting materials with great mechanical properties without considering the ease of molding of the material. Warpage, short shots, part cosmetics, and other problems are typically more likely to be issues with higher-end materials such as filled crystalline resins, high-viscosity amorphous resins, and engineering resins. Selecting these high-performance resins often results in increased program costs due to higher tooling costs, delays in mold sampling approvals, and added rework costs.
So when selecting materials for a new project, treat the material search as a critical task with adequate funding for a detailed search and testing (using either internal resources or outside consultants). And do not rely solely on data sheets or conversations with materials suppliers.
Moreover, in the final material selection, if an unfamiliar material is selected, it’s money well-spent to mold and test some sample parts to better understand the material before committing to it, following these steps:
• Ask your molder if they have a mold for testing that has some similar design characteristics as your part (size, wall thickness, and so on).
• Run sample parts on this mold to better understand the shrinkage, warpage, sink, shear sensitivity at the gate, and difficulty of ejection.
• Make sure to run sample parts using the actual production colors. Color can often affect the shrinkage, warpage, and mechanical properties of the part (especially with crystalline materials). Also, note that in some cases lubricants may be added to the masterbatch to help disperse colorants, changing required processing conditions and properties of the molded part.
• In addition, for critical applications, mechanical properties and chemical resistance can be tested and compared to published data. (This work may need to be done using an outside lab.)
5.) The Mistake of Relying on Low-Cost or Free Filling Analysis
Filling analysis is a great tool for screening various product design and material options early in product development. It also provides valuable information to assist with tool design and to help in making important cost decisions for tooling and processing machinery.
However, good analysis takes experience, knowledge, creativity, and time—something many managers do not realize. Do not try to save money by relying on “free” analysis from an engineer not skilled at analysis, or from a busy analyst working at a vendor. At best, you will get only a cursory screening analysis. Sometimes, just a single flaw in a part design or a few thousandths of an inch difference in wall thickness can change the entire outcome of tool sampling. The “surgical” analysis takes time, many iterations (to test theories), and years of experience to master.
6.) Wrong vs. Right Ways of Saving Money on Prototype Tooling
The two primary functions of a prototype tool is to test the viability of the product design and material selection, and to understand the tooling requirements for the production mold. In many cases, in an effort to save time and money, shortcuts are taken in the prototype mold which can result in sample parts being substantially different than those produced in the production mold, resulting in faulty information for designing the production tool. Just some of these cost savings in the prototype mold may include:
• the use of a standard mold base with less cooling than the production tool;
• changes in part design to allow the tool to be entirely CNC machined;
• hand-loaded inserts for side action;
• a simplified ejection system;
• softer tool steels; and
• gating and venting which are different from the production mold’s.
Compared to the production tool, the prototype tool may run hotter, need to be filled more slowly, have longer cycle and mold-open times, and need to be processed at lower pack pressures. The sample parts may require manual trimming of flash, as well as post-molding fixturing or annealing.
A better solution is to stick with a single toolmaker for both prototype and production tooling. This allows for a more seamless transfer of knowledge. Working together with the toolmaker, the team can develop cost- and time-saving shortcuts for the prototype mold, with the goal of providing the required critical engineering information to design the production mold.
Project Examples
Example 1: Using the Wrong Material for Motorcycle Protective Skirts
To help illustrate the above points, this first example concerns a company supplying aftermarket protective plastic skirts for motorcycles. The company had called a large material supplier who offered free technical advice and recommended one of their resins. Six production tools were built offshore, and sample parts were shipped to the company for evaluation. The parts cracked during the abusive testing required for this part.
The solution was to switch to a super-tough glass-filled nylon 66 supplied by a different source. Unfortunately the material’s shrinkage properties required expensive tool rework. The outcome was that the company ended up switching to a material which resulted in several months of project delays and tens of thousands of dollars in increased development costs.
In this case, a quick call to a material supplier for a recommendation—without testing the material or getting outside, unbiased recommendations—proved to be an expensive mistake.
Example 2: Offshore Tooling and Sampling of a Medical Instrument Housing

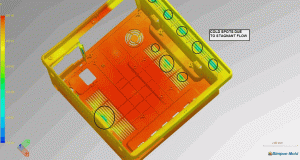
For a medical housing (“Example 2”), filling analysis confirmed that the short shots at the louvre vents (circled) resulted from cold spots and stagnant flow regions during molding.
For this project, I was asked to help with problems from a large, offshore tool-build consisting of more than thirty injection molds for a medical instrument company. This particular part was a large, complex instrument housing. The chosen material was a stiff-flowing polycarbonate with a melt flow index of 10. The client had used this grade for many previous projects and was satisfied with the mechanical properties and chemical resistance. In an effort to reduce costs, the tools were built and all sampling was done offshore.
The sampled parts had the following problems:
• The part was slightly undersized, even though the client had a good history of shrinkage values to use for this material.
• The part had several louver vents which were too fragile, and occasionally had short shots at the middle of the vents.
• The part had unsightly weld lines on several show surfaces.
• The part surface texture had some shiny regions, and other regions that were too dull.
To get started on a solution, a lengthy discussion was held with the client and the off-shore vendors to understand the history of the part sampling, reviewing the process sheets and tool design. I also was sent the “free” mold filling analysis run for this tool. The first red flag was that this offshore vendor had no experience running stiff PC. They typically ran easier-to-process materials, like ABS or ABS/PC blends, for most of their electronics housings.
The issues were as follows:
• The filling analysis conclusions were wrong. It showed a fill pressure of around 14,000 psi [97 MPa]. This sounded too low for this part size with a stiff-flowing PC.
• Re-running the analysis with some additional runner details pushed the fill pressure closer to 18,000 psi [124 MPa]. The difficult venting for this part and the upstream pressure losses will easily increase the total fill pressure to 23,000 psi [159 MPa] or more—higher than the 20,000 psi [139 MPa] available on the press.
• The mold had a long cold sprue which was too restrictive.
• The mold did not have adequate perimeter venting or the required number of self-cleaning ejection pins at the internal louver details on the part.
• The selected steel and tool design would not allow for the high injection pressures.
• The mold was being run at too low a temperature for the PC (170°F [77°C], versus a recommended 190°F [88°C] or higher), and its cooling system was undersized, likely resulting in large temperature variations.
 In processing with this tool, the molder was forced to use a slower fill time due to the high fill pressure and venting issues. In addition, the switch-over from the filling to packing stage was set early to prevent flashing, and the pack pressure was also set at a low pressure to prevent flashing. This resulted in an underpacked part which was undersized and had poor surface cosmetics and weak weld lines.
The recommended corrective actions were as follows:
• Replace the restrictive cold sprue with a hot drop, equipped with a 6-mm valve gate. (This was rejected due to cost; instead, the cold sprue and nozzle I.D. were opened up as much as possible: a 6-mm diameter at top of sprue and 5-mm diameter nozzle I.D.)
• Add additional ejection under the louver region with flats ground on the pin to allow for better venting. (Additional perimeter venting was also added.)
• Modify the cross-section of the louvers with a central flow leader, to reduce the flow hesitation in the middle and to help push the weld line away from middle.
• Add a 0.5-mm flow leader to the bottom of the part to reduce the fill pressure. (This change was made, with the aid of more than a dozen simulations to optimize the design.)
• Increase the mold temperature to a starting value of 190°F (88°C). (Molding a stiff-flowing grade of PC requires a hot mold and a reasonably fast fill time, since the material loses heat quickly.)
With the above changes, successful sampling of the parts was now possible. The fill pressure was reduced to around 18,000 psi [124 MPa]—still high, but not unusual for this material. The louvers no longer had short shots, and the cosmetics of the parts were now acceptable. The mold was still not adequately rigid for this material, and the cooling was not optimal, but this could not be corrected at this late stage.
Summary
Through lessons and examples, it has been shown how management needs to understand the complexity of plastics engineering, material selection, analysis, and prototyping. It’s important to build a technical team of advisors consisting of internal team members, vendors, and unbiased outside experts. Management needs to appropriate the required time and funding for these critical stages of a project, since mistakes at this early stage can result in costly fixes and project delays.
About the author: Mark Rosen, principal of Corex Design Group Inc., provides expert plastics design, engineering, and management services. He can be reached at www.corexdg.com.